Hey! I remembered the password!
Wow, lotta cobwebs around here, let me tidy up a bit… How many updates?! OK, install install install… done.
So, uh, it’s been *cough* a while since I’ve done anything here, uh… shit. Almost two years? This must surely be a sign of the End Times then, so if you’ve ever wanted to to anything wild and crazy, now may be a good time to do it. Go kiss your crush, you may never get another chance. Tell ’em I said it was okay.
*Ahem*
So, as you can see in the title there, I had a problem with a keyboard recently and managed to fix it. There were a couple points that weren’t online anywhere, so I figured I should be a good ‘Netizen and document my findings.
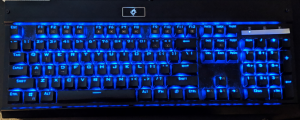
The keyboard is an Eagletec KG010. It’s a mechanical jobber with a nice click action, and a pretty blue backlight, and when I bought it they went for $50 on Amazon. I think one of the nicest features that is NOT shared by several keyboards in the $100+ range is that it includes the shift-symbols in the backlight – crucial for folks like me that can’t touch-type to save their life and must stare at the keyboard to find anything. (I’m talking about you, Razer…)Â
(Don’t mind the strip of yellow sticky-note over the status LEDs, it’s there because those lights are blinding…)
Anywho, it’s a good deck and I was happy with it – until the Windows key stopped working totally and things were getting weird with other keys on the left-hand side. I figured the thing was dead, and bought a replacement from another company. (Yet another board without the symbols lit…)
In the back of my head, however, the part of me that used to be an electronics guy kept thinking that maybe there’s a simple fix. So, I took it home to tinker on in a spare minute or three. That moment came around and I started digging around for teardown instructions just on the off-chance someone else had been there first, but I couldn’t find anything. Aha! Inspiration for a post!
So, for anyone else that may need to look into the operations of a decent mechanical keyboard, here you go.
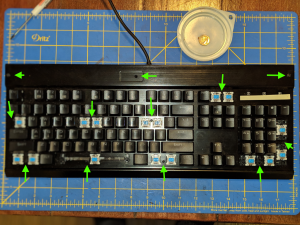
Screw locations:
You’ll have to pull off a number of keycaps to get to them all, but the caps just pull off. You can find tools for this on Amazon, or just do it carefully with a pair of needle-nose pliers. All of the screws are the same except for the two dressy ones at the top, so don’t worry about mixing them up. Those two won’t fit anywhere else so you’re good.
That depression at the top is where the manufacturer logo sticker goes. I was all prepared to have a fight with it and risk scratching the top plate to get it off, but about the only thing holding it on was a static charge – the glue was terrible and it popped right off. Shrug.Â
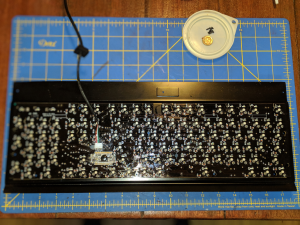
Once the screws are out, lift the top plate away from the plastic base (careful with the cable) and flip it over to reveal the business-side of the circuit board:
Once I had it flipped over, it only took me about 5 minutes to spot what the actual problem was: a component had somehow popped off – a signal diode. Specifically, an OEC PMLL4148L. Thankfully, I have a buddy that works in electronics manufacturing that was able to snag me a few of them, cost him a grand total of 11 cents rather than me buying 100 of them from Amazon for $5.
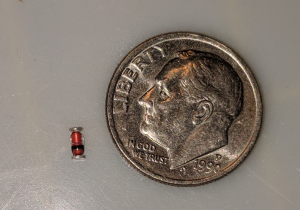
Like all surface-mount parts, it’s tiny. Here’s one next to a dime for scale:
I promptly dropped this one and it disappeared. Points to my buddy for delivering it with 4 other friends.
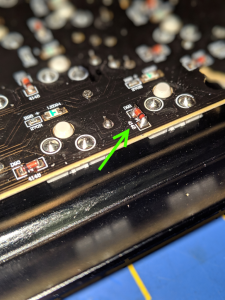
Here it is after I replaced it:
Yeah, yeah, my soldering skills leave a bit to be desired. It’s been almost 20 years since I’ve soldered SMT components. :P
And that was, as they say, that. No idea how that diode managed to break off in the first place, the solder that was left on the board didn’t look to bad, and it was just sitting on my desk. I dunno, maybe the office cleaning crew picked it up to dust and dropped it or something. The important bit is, it works again.
Score one for the Wolfe.

That is WAY TOO TINY of a component for me to ever even think about working with! Wowza.